1. 관리자 권한 획득
sudo -i
2. 패키지 업데이트
apt update
3. MySQL 패키지 설치
apt-get install mysql-server mysql-client
4. MySQL 설치 확인(버전 확인)
mysql --version

>> mysql  Ver 8.0.30-0ubuntu0.20.04.2 for Linux on x86_64 ((Ubuntu))
4-1. MySQL 설치확인
mysql_secure_installation(1)

암호검증 유/무
(2)
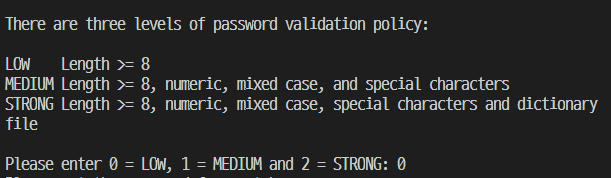
암호복잡도 정책
(3)
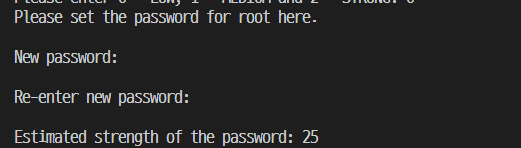
루트계정 암호 설정
(3) 과정에서 오류발생
... Failed! Error: SET PASSWORD has no significance for user 'root'@'localhost' as the authentication method used doesn't store authentication data in the MySQL server. Please consider using ALTER USER instead if you want to change authentication parameters.
해결방법
sudo mysql

set global validate_password.policy=LOW; // 비밀번호 정책 변경 (최소 8글자 이상 비밀번호)

show variables like 'validate_password%';

alter user 'root'@'%' identified by 'new_password'
해결방법 참조
[Solved] Failed! Error: SET PASSWORD has no significance for user 'root'@'localhost' as the authentication method used doesn't s
To Solve Failed! Error: SET PASSWORD has no significance for user 'root'@'localhost' as the authentication method used doesn't store authentic
exerror.com
(4)

루트 계정의 암호를 사용할 것 인지 ?
(5)

익명의 유저를 지울 것인지?
(6)
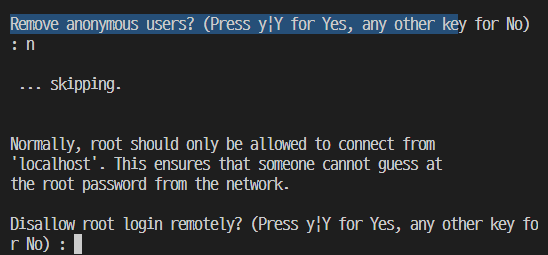
root 유저가 local에만 접속하는지?
(7)

테스트 데이터를 지울 것인지?
(8)

테이블 권한 확인
5. mysql 실행
service mysql start
6. mysql 상태확인
service mysql status
7. mysql cnf 파일 설정
=> 외부 접속 허용, 포트 번호 변경, 서버 재시작시 MySQL 자동 활성화
참조: https://goodea.tistory.com/86
(1) port 번호 변경
cd /etc/mysql/mysql.conf.da. ls로 파일 목록 출력
ls
>> mysql.cnf  mysqld.cnf
b. 파일 편집기로 mysqld.cnf 수정
vi mysqld.cnf
[mysqld] 로 시작하는 부분의 port 번호를 원하는 번호로 변경
참조 : https://skylit.tistory.com/253
포트가 변경됐는지 확인가능
show global variables like 'port';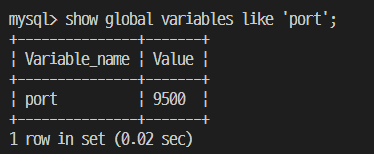
c. localhost 확인
SELECT Host,User,plugin,authentication_string FROM mysql.user;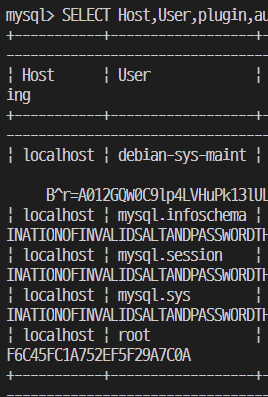
root 계정으로는 localhost로 밖에 접근이 안된다는 의미
참조: - https://zetawiki.com/wiki/MySQL_%EC%9B%90%EA%B2%A9_%EC%A0%91%EC%86%8D_%ED%97%88%EC%9A%A9
- https://2vup.com/mysql-db-error/
d. 모든 IP 허용
에러발생
grant all privileges on *.* to ''@'%' identified by '';ERROR 1064 (42000): You have an error in your SQL syntax; check the manual that corresponds to your MySQL server version for the right syntax to use near 'identified by 'newoop0510'' at line 1
해결방법
https://dzzienki.tistory.com/22
set global validate_password.policy=LOW;

create user 'user'@'%' identified by 'password';

grant all privileges on *.* to 'user'@'%' with grant option;

flush privileges;
(2) sql 외부 접속 허용
a. 허용 IP 대역 확인
net stat -ntlp | grep mysqld
b. 허용 IP 변경
cd /etc/mysql/mysql.conf.d
vi mysqld.conf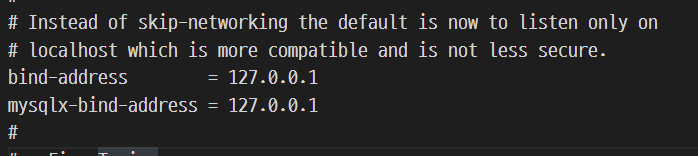
이 부분에 127.0.0.1 을

0.0.0.0 으로 변경해서 모든 IP 대역으로 적용시킨다.
(3) 서버 재부팅시 MySQL 자동 활성화 설정
sudo systemctl enable mysql
>> Synchronizing state of mysql.service with SysV service script with /lib/systemd/systemd-sysv-install.
Executing: /lib/systemd/systemd-sysv-install enable mysql
7-3. mysql 재실행
service mysql restart

or

/etc/init.d/mysql restart
8. cnf 설정 사항 잘 반영됐는지 확인하기!
netstat -ntlp | grep mysqld

mysql> SELECT Host,User,plugin,authentication_string FROM mysql.user;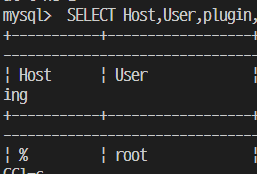
'Web > Server' 카테고리의 다른 글
| [Linux] Ubuntu MongoDB 설치 (0) | 2022.08.24 |
|---|---|
| [Linux] Ubuntu - MySQL 삭제 및 재설치 (0) | 2022.08.17 |
| [Linux] 내가 주로 쓰는 명령어 정리 (0) | 2022.08.15 |
| [Oracle DB] 오류 | ORA-12514 (0) | 2022.08.09 |

